
My son loves blueberries in any form that he can get them so I always have some frozen ones on hand, throughout the year. I often make different shakes and smoothies with them but this time I decided to try and make my own pop tarts.
See, he always wants me to get him pop tarts in the store. They look so yummy and happy on their boxes with all the frosting and sprinkles, and I am so disgusted by them, for whatever reason…I just didn’t grow up with anything like it and when I actually tried one, they tasted so….artificial. And they are certainly not very healthy. So I never buy them. But, instead of making a blueberry pie, I decided to make them into nice little ‘pop tarty’ pockets that would appeal to my son. Let me tell you, they appealed to everyone, including my no sweets eating husband!
This turned out to be incredibly easy, because I already have a go to pie crust recipe, the filling is literally warming up some frozen blueberries with a bit of sugar, lemon juice and peel and corn starch, and you can play with the toppings!
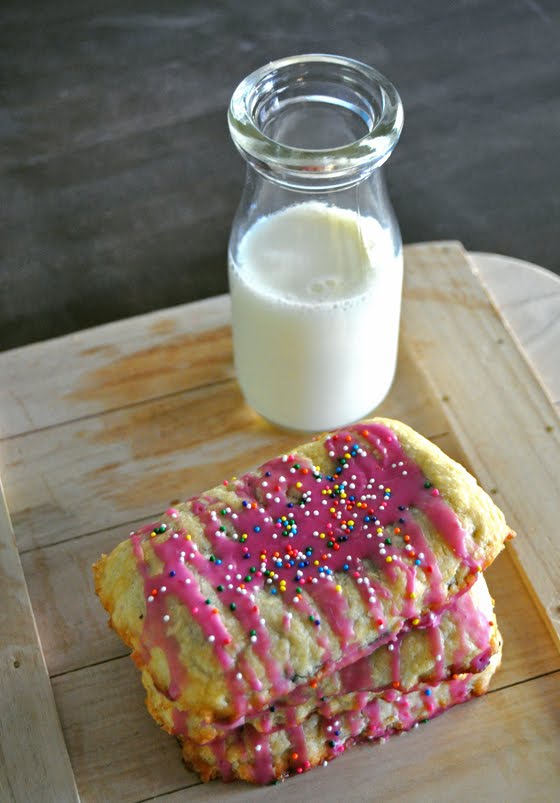
I made two versions, the almost no frosting and no sprinkles for adults, and these pictured for my son.
As for the shape, I have a mini pie/tart plastic mold maker so it was truly easy, but you can just as easily cut up little rectangles and make your own!

Blueberry Pop Tarts
Pie Crust (by Dorie Greenspan):
3 cups of flour
1/4 cup of sugar
1 1/2 tsp salt
1/2 cup ice cold water
2 1/2 sticks butter, very cold and cut into cubes
1/3 cup shortening, also very cold
Put flour, salt and sugar into the food processor and pulse a few times. Add the butter and the shortening and pulse until you get pea size pieces of butter and then start adding water, tablespoon at the time. Pulse until just combined. You may not need all the water. The dough just needs to keep together when pinched. The less you mess with it, the better it will be.
Turn the dough out on the clean surface and shape a ball, cut in two pieces, reshape into a ball and wrap into plastic wrap. You need to let it rest in the fridge for an hour.
*I always make this amount and often freeze one half of the dough and use it in the next two weeks for a fresh batch of goodies. This amount makes two 9″ pies or a lot of pop tars so you decide if you want to half the recipe at the start, freeze some up or use it all!
After the dough is rested roll it out on a floured surface to desired thickness. For pie I do it a bit thicker than I do for these pop tarts. At this time you will either cut out your rectangle shapes or use the mini pie maker to put the filling in. I put about 1 1/2 tbsp to 2 tbsp of filling into each tart, it will depend on the size of the ones you make at home. If you put too little it is not as bad as if you go with too much, that will give you problems with sealing it.
The pie maker seals the tarts on it’s own, if you are making them by hand, seal the edges with a fork.
Blueberry Filling:
3 cups frozen blueberries
2/3 cups sugar
2 1/2 tbsp corn starch
peel of one lemon
2 tbsp of lemon juice
Add all the ingredients except corn starch to a pan and cook on medium heat.
*If you will be making the frosting like me, reserve 2 tbsp of blueberry juice before adding corn starch.
After 10 minutes add the cornstarch and cook for 5 more minutes, if it is thickening too much you can add a few tbsp of water. Cool off a bit before filling your tarts.
Bake it on 400 degrees for about 30 minutes (check it after 20) or until nicely golden brown.
For my toppers I used 2 tbsp of reserved blueberry juice mixed with confectioners sugar. Also, I used colorful sprinkles, but you could do whatever you like, put a lemon frosting, or vanilla would go nice too. White chocolate!!! Many yummy options here…I hope you enjoy these 🙂

With this recipe I am entering The U.S. Highbush Blueberry Council contest at littlebluedynamos.com. Wish me luck, please! 🙂
Jako lepo izgledaju…
Hvala Miki 🙂
these look amazing…easy too. thank you!
Are these to be baked or fried? What temp and for how long? Good luck with your entry in the contest, but if you have not yet entered it, please check your spelling of "flowered" should be floured… 🙂
They are baked, I just edited the post with that information now included and embarrassing typo fixed. Thank you so much, I guess I should always have my hubby behind my back proof reading my posts 😀
It makes me wonder what other disasters I wrote in the past years and people are too nice to tell me! :)))
These are gorgeous!
Okay i want to make these but dont have a pie maker…
you never said how to cook them if you dont have a pie maker??
oven? heat temp? time?
As I already said in my post, if you do not have a pie maker, after rolling the dough you just cut them into rectangles of desired size and once stuffed you seal them with a fork.
Also, the baking time is the same for both, that is why I only wrote it once, at 400 degrees for about 30 minutes (check it after 20) or until nicely golden brown. Every oven is different and my friend saw they were perfect after 25 minutes, so therefore the checking.
I read your post and I really appreciate your experience. I will get good knowledge from there as well. Keep posting… mold suppliers / Acme India
You had me with the delightful sprinkles. I would like to modify this by adding Brown Cow Choco Syrup. I can just imagine that.
your a genius!